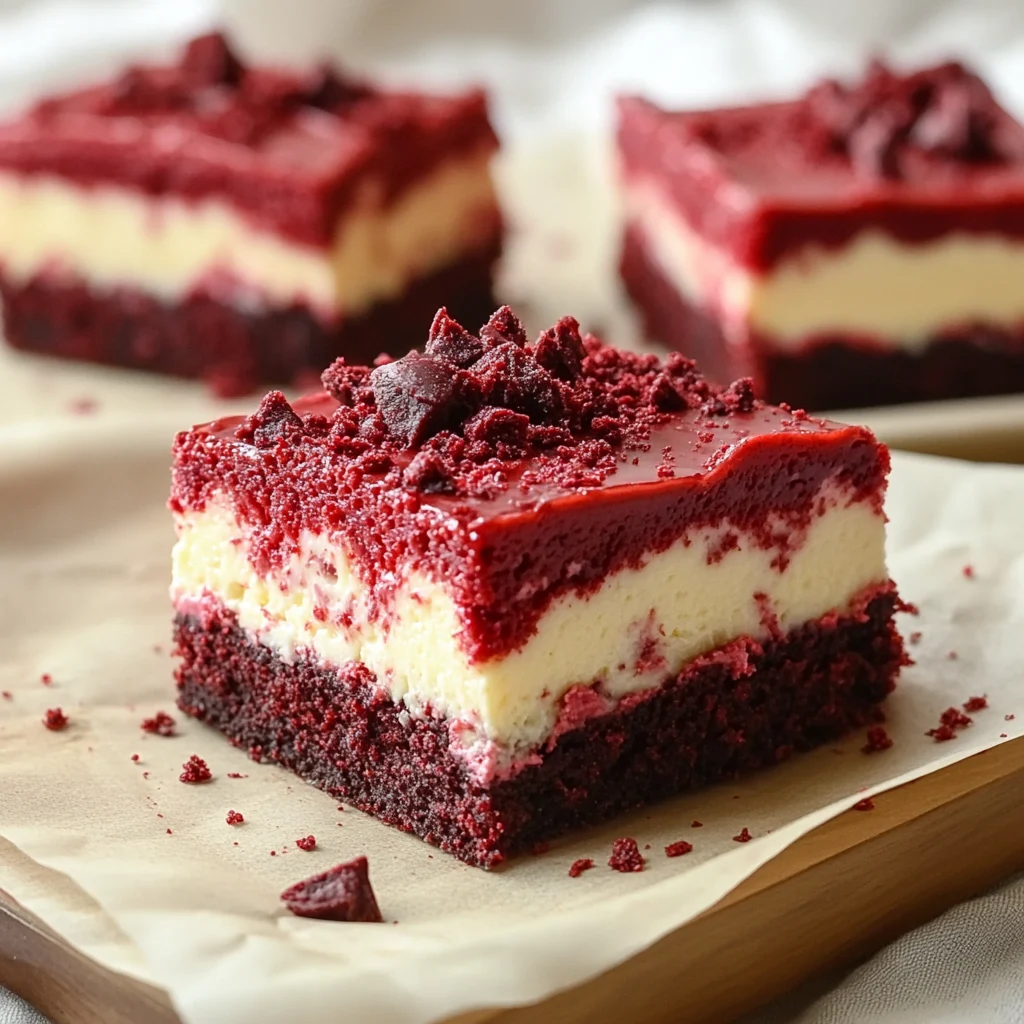
Decadent Red Velvet Cheesecake Bars
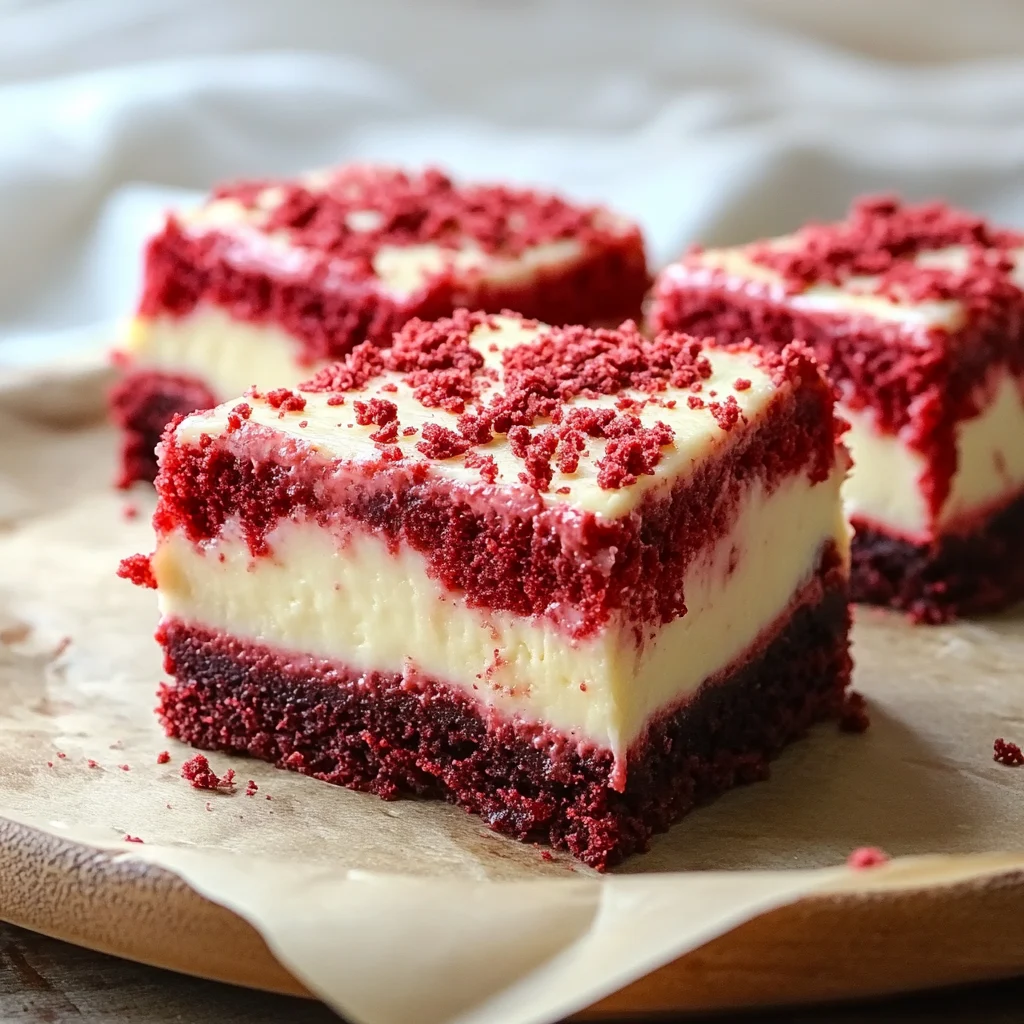
Description of this recipe: These Red Velvet Cheesecake Bars are a delightful combination of rich red velvet cake and creamy cheesecake, all in an easy-to-make bar form. Perfect for parties, holidays, or any occasion that calls for a stunning dessert.
Why you will love this recipe:
- Easy to make: Forget fussy layered cakes! These bars are simple to prepare and bake in one pan.
- Perfect balance of flavors: The slightly tangy cheesecake complements the subtle chocolate flavor of the red velvet beautifully.
- Gorgeous presentation: The vibrant red and white swirls create a visually stunning dessert that will impress your guests.
- Make-ahead friendly: These bars can be made a day or two in advance, making them ideal for entertaining.
- Portable and shareable: Easy to slice and serve, these bars are perfect for potlucks, picnics, or bake sales.
Introduction
Red velvet is a classic flavor that evokes a sense of warmth and nostalgia. Paired with the creamy tang of cheesecake, it creates a dessert that’s both comforting and sophisticated. These Red Velvet Cheesecake Bars take the best of both worlds and combine them into a convenient and crowd-pleasing treat.
The history of red velvet cake is shrouded in a bit of mystery. Some say it originated during the Depression era, when cooks used beet juice to enhance the color of their cakes. Others claim it was a marketing ploy by a food coloring company in the 1940s. Regardless of its origins, red velvet has become a beloved flavor, especially during the holidays.
These bars are not only delicious but also visually appealing. The contrasting colors of the red velvet and cheesecake create a beautiful marbled effect, making them a showstopper on any dessert table. They’re perfect for celebrating Valentine’s Day, Christmas, or any special occasion.
Ingredients:
Red Velvet Layer
- ½ cup (1 stick) salted butter, melted
- 2 oz semi-sweet baking chocolate, melted and cooled slightly
- 1 cup granulated sugar
- 2 large eggs
- 2 teaspoons vanilla extract
- 2 teaspoons red food coloring (gel or liquid)
- ⅔ cup all-purpose flour
Cheesecake Layer
- 8 oz cream cheese, softened to room temperature
- 1 large egg
- ⅓ cup granulated sugar
- 1 teaspoon vanilla extract
Preparation:
Step 1: Preheat your oven to 350°F (175°C). This temperature ensures that the bars bake evenly without browning too quickly. Proper oven temperature is crucial for achieving the perfect texture.
Step 2: Prep your pan: Line an 8×8-inch baking pan with parchment paper, leaving an overhang on the sides for easy removal. Then, spray the parchment paper with non-stick cooking spray. If you don’t have parchment paper, spray the pan generously with non-stick cooking spray and dust with flour to prevent sticking. The parchment paper ensures easy removal and clean edges for your bars.
Step 3: Melt the butter and chocolate together: In a microwave-safe bowl, combine the melted butter and semi-sweet chocolate. Heat in 30-second bursts, stirring in between each burst, until the chocolate is completely melted and smooth. Set aside to cool slightly. It is important not to overheat the chocolate, as it can seize up and become grainy.
Step 4: Make the red velvet batter: In a large bowl, whisk together the granulated sugar, eggs, vanilla extract, and red food coloring until well combined. Ensure the eggs are fully incorporated into the mixture for a smooth batter.
Step 5: Combine wet and dry ingredients: Stir in the cooled melted chocolate mixture into the egg mixture until well combined.
Step 6: Add flour: Sprinkle the all-purpose flour on top of the wet ingredients and gently fold it into the batter using a spatula or large spoon. Be careful not to overmix the batter, as this can develop the gluten in the flour and result in tough bars. Gently fold until just combined.
Step 7: Pour into the pan: Pour the red velvet batter into your prepared baking pan and smooth the top with a spatula or the back of a spoon. Ensure an even layer of batter for even baking.
Step 8: Make the cheesecake layer: In a separate bowl, beat the softened cream cheese, egg, granulated sugar, and vanilla extract with an electric mixer until smooth and creamy. Make sure the cream cheese is at room temperature to prevent lumps in the batter. The mixture should be light and fluffy.
Step 9: Dollop and swirl: Dollop spoonfuls of the cheesecake mixture evenly over the red velvet batter.
Step 10: Swirl the layers: Use a knife or a skewer to gently swirl the cheesecake mixture into the red velvet base. Be careful not to over-swirl, as this can muddy the colors. Aim for a marbled effect.
Step 11: Bake: Bake in the preheated oven for 35–40 minutes, or until a toothpick inserted into the center comes out clean or with just a few moist crumbs attached. The edges should be set, and the center should not jiggle.
Step 12: Cool and chill: Let the bars cool completely in the pan on a wire rack. Once cooled, cover the pan with plastic wrap and chill in the refrigerator for at least 2 hours before slicing and serving. Chilling helps the bars to firm up and makes them easier to slice.
COOKING Rating:
- Difficulty: Easy
- Prep Time: 20 minutes
- Cook Time: 35-40 minutes
- Total Time: 2 hours 55 minutes (includes chilling time)
Serving Suggestions:
- Serve the bars chilled for the best texture and flavor.
- Dust with powdered sugar before serving for a pretty presentation.
- Drizzle with melted white chocolate or a simple glaze for added sweetness.
- Garnish with fresh raspberries or strawberries for a pop of color.
- Serve with a scoop of vanilla ice cream or whipped cream for an extra indulgent treat.
- Cut into small squares for a bite-sized dessert, or larger squares for a more substantial serving.
- Perfect for parties, potlucks, holidays, or any special occasion.
Tips:
- Make sure your cream cheese is at room temperature before making the cheesecake layer. This will prevent lumps in the batter and ensure a smooth, creamy texture.
- Don’t overmix the red velvet batter, as this can develop the gluten in the flour and result in tough bars. Gently fold the flour in until just combined.
- Be careful not to over-swirl the cheesecake mixture into the red velvet base, as this can muddy the colors. Aim for a marbled effect.
- Line your baking pan with parchment paper for easy removal and clean edges.
- Chill the bars completely before slicing and serving. This will help them to firm up and make them easier to slice.
- For a richer flavor, use high-quality semi-sweet chocolate.
- If you don’t have red food coloring, you can use beet juice for a more natural option.
- Store the bars in an airtight container in the refrigerator for up to 3 days.
Prep Time: 20 minutes
Cook Time: 35-40 minutes
Total Time: 2 hours 55 minutes (includes chilling time)
Nutritional Information (per serving):
(Note: Nutritional information is an estimate and may vary based on specific ingredients and portion sizes.)
- Calories: Approximately 350-400
- Protein: 5-7 grams
- Sodium: 150-200 mg
Conclusion
These Red Velvet Cheesecake Bars are a delightful and visually stunning dessert that’s sure to impress. With their perfect balance of flavors and easy preparation, they’re a great choice for any occasion. Whether you’re hosting a party, attending a potluck, or simply craving a sweet treat, these bars are guaranteed to be a hit. So gather your ingredients, preheat your oven, and get ready to enjoy a truly decadent dessert experience!
Questions and Answers about this recipe:
Q1: Can I use a different size pan?
A: Yes, you can use a 9×13-inch pan, but the bars will be thinner and may require less baking time. Keep an eye on them and check for doneness after about 30 minutes. You can also double the recipe to fit a 9×13 inch pan and maintain the original bar thickness.
Q2: Can I make these bars ahead of time?
A: Absolutely! These bars are perfect for making ahead of time. In fact, chilling them in the refrigerator for at least 2 hours before slicing and serving actually improves their texture and flavor. You can make them a day or two in advance and store them in an airtight container in the refrigerator.
Q3: Can I freeze these bars?
A: Yes, you can freeze these bars for up to 2-3 months. Wrap them tightly in plastic wrap and then in aluminum foil, or place them in a freezer-safe container. Thaw them in the refrigerator overnight before serving.
Q4: Can I use a different type of chocolate?
A: Yes, you can experiment with different types of chocolate, such as milk chocolate or dark chocolate, depending on your preference. Keep in mind that the sweetness and intensity of the flavor will vary. White chocolate would also offer an interesting contrast.
Q5: Can I reduce the amount of sugar in this recipe?
A: You can reduce the amount of sugar slightly, but keep in mind that sugar contributes to the texture and moistness of the bars. Reducing it too much may result in a drier or less tender product. Try reducing it by 1/4 cup in both the red velvet layer and the cheesecake layer, and see if you still enjoy the results.