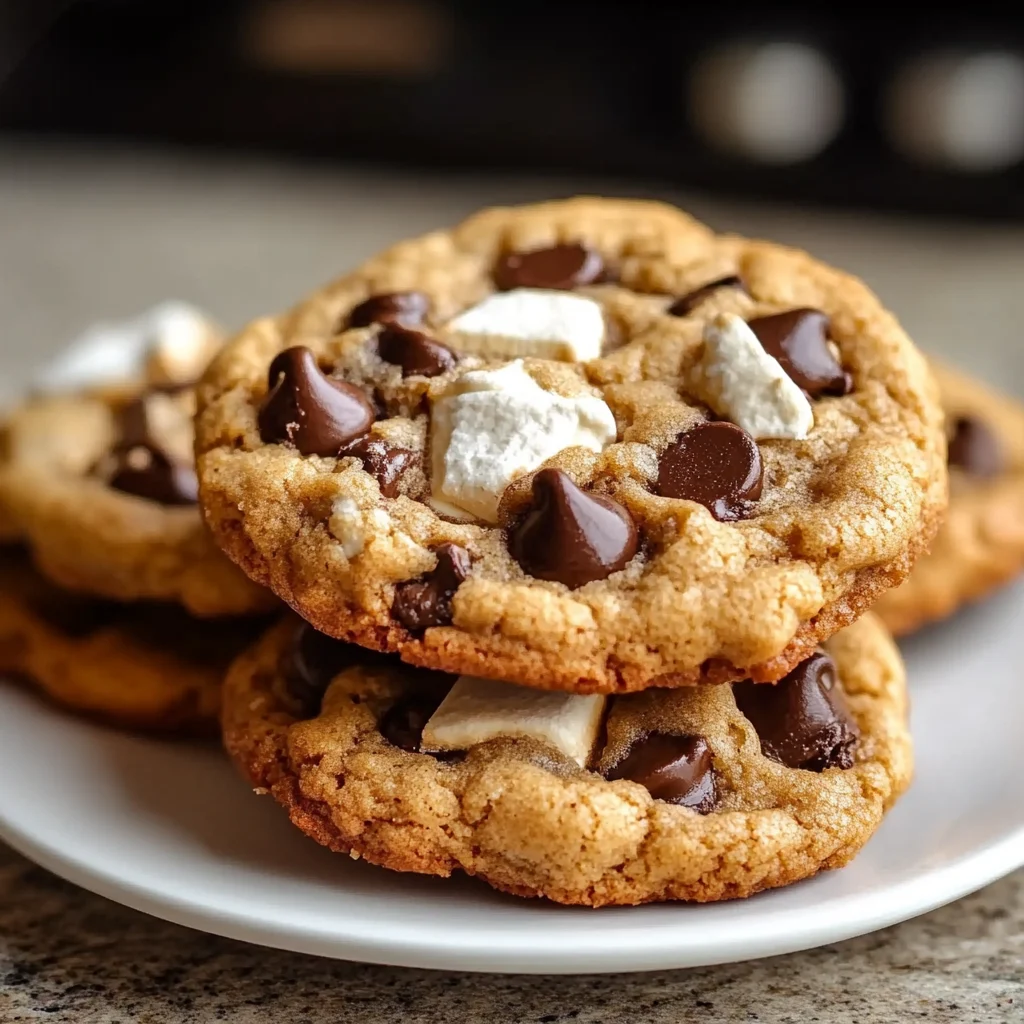
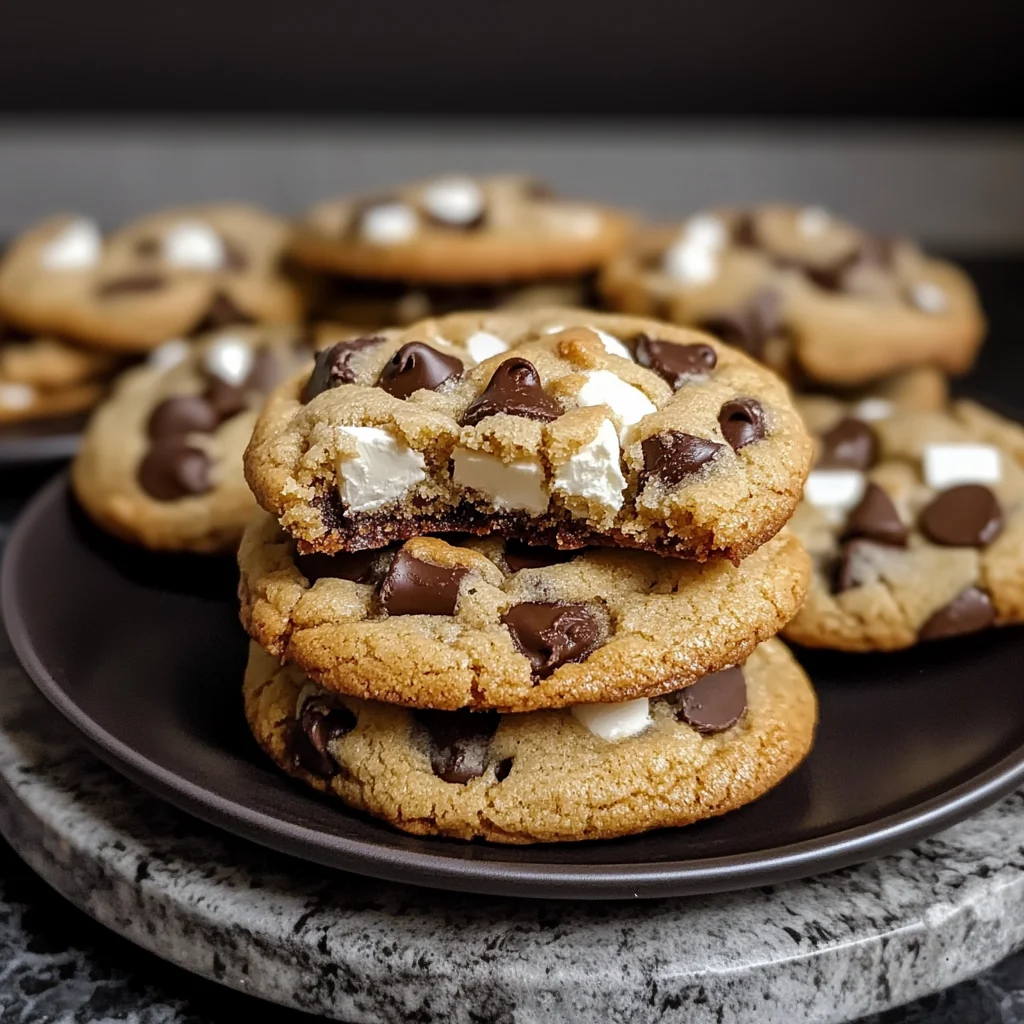
S’mores Chocolate Chip Cookies
Description of this Recipe
These S’mores Chocolate Chip Cookies combine the best of both worlds: the comforting familiarity of chocolate chip cookies and the classic campfire flavors of s’mores. Each bite delivers a soft, chewy cookie base loaded with chocolate chips, topped with gooey toasted marshmallows, melted chocolate, and a sprinkle of graham cracker crumbs. It’s a delightful twist that brings the essence of summer nights indoors, perfect for any occasion.
Why You’ll Love This Recipe
You’ll love this recipe because it transforms a beloved campfire treat into an accessible, everyday indulgence. These cookies are incredibly easy to make, requiring minimal effort for maximum flavor. The combination of textures—soft cookie, gooey marshmallow, melted chocolate, and crunchy graham cracker—creates a symphony of sensations in your mouth. Plus, they’re a guaranteed crowd-pleaser, perfect for parties, bake sales, or simply satisfying your sweet tooth.
Introduction
S’mores are synonymous with summer, campfires, and good times. The simple act of roasting a marshmallow and sandwiching it between chocolate and graham crackers is a timeless tradition. This recipe takes that cherished experience and elevates it into a delightful cookie form. The result is a treat that not only tastes amazing but also evokes feelings of warmth and nostalgia. Whether you’re an experienced baker or a novice in the kitchen, these S’mores Chocolate Chip Cookies are a surefire way to impress and delight.
Ingredients:
- 3/4 cup (12 Tbsp; 170g) unsalted butter, softened to room temperature
- 3/4 cup (150g) packed light or dark brown sugar
- 1/4 cup (50g) granulated sugar
- 1 large egg, at room temperature
- 2 teaspoons pure vanilla extract
- 2 cups (250g) all-purpose flour (spooned & leveled)
- 2 teaspoons cornstarch
- 1 teaspoon baking soda
- 1/2 teaspoon salt
- 1 and 1/4 cup (225g) semi-sweet chocolate chips
- 12 regular marshmallows, cut in half
- One 4-ounce (113g) semi-sweet chocolate bar, finely chopped
- 1/3 cup (35g) crushed graham cracker crumbs
Prep:
Step 1: Cream Together the Sugars and Butter
In a large mixing bowl, combine the softened butter, brown sugar, and granulated sugar. Use a handheld mixer or a stand mixer with the paddle attachment to beat the mixture on medium speed for about 2-3 minutes until it becomes light and fluffy. This step is crucial for achieving a soft cookie texture.
Step 2: Add Egg and Vanilla
Add the large egg and pure vanilla extract to the creamed mixture. Mix until everything is well combined, ensuring there are no streaks of egg yolk. Scrape down the sides and bottom of the bowl to ensure even mixing.
Step 3: Combine Dry Ingredients
In a separate bowl, whisk together the all-purpose flour, cornstarch, baking soda, and salt. The cornstarch helps to keep the cookies soft, while baking soda provides the necessary lift.
Step 4: Mix Wet and Dry Ingredients
Gradually add the dry ingredients to the wet ingredients. Beat on low speed until just combined. Be careful not to overmix, as this can result in tough cookies. The dough will be slightly thick.
Step 5: Add Chocolate Chips and Chill
Stir in the semi-sweet chocolate chips until they are evenly distributed throughout the dough. Cover the dough tightly with plastic wrap or aluminum foil and chill in the refrigerator for at least 1 hour, or up to 2 days. Chilling allows the flavors to meld together and prevents the cookies from spreading too much during baking.
Step 6: Preheat Oven and Prepare Baking Sheets
When you’re ready to bake, preheat your oven to 350°F (177°C). Line two large baking sheets with parchment paper or silicone baking mats. This will prevent the cookies from sticking and make cleanup easier.
Step 7: Shape the Cookies
Remove the chilled dough from the refrigerator and let it sit at room temperature for about 10 minutes to soften slightly. Use a cookie scoop or your hands to form 1.5-tablespoon-sized balls of dough. Place the dough balls about 2 inches apart on the prepared baking sheets.
Step 8: Bake the Cookies
Bake the cookies for 10-11 minutes, or until the edges are barely golden brown and the centers still appear soft. The cookies will continue to bake slightly as they cool on the baking sheets.
Step 9: Toast the Marshmallows
Once the cookies are baked, switch the oven to high broil (or low if your oven tends to run hot). Place half a marshmallow, sticky side down, on top of each cookie. Return the cookies to the oven and broil for just 1-2 minutes, until the marshmallows are lightly toasted and golden brown. Watch them closely to prevent burning!
Step 10: Melt Chocolate and Add Toppings
While the cookies are cooling slightly, melt the chopped semi-sweet chocolate in a double boiler or microwave. If using the microwave, heat in 20-second intervals, stirring in between, until smooth and melted. Drizzle the melted chocolate evenly over the toasted marshmallows and sprinkle with crushed graham cracker crumbs.
Step 11: Let the Cookies Set
Allow the cookies to cool completely at room temperature for about an hour, or refrigerate for 30 minutes to speed up the setting process. This allows the chocolate to harden and the flavors to meld together beautifully.
COOK Rating:
5/5 Stars – An exceptional recipe that perfectly captures the flavors of s’mores in a cookie.
Serving Suggestions:
- Serve these cookies warm with a glass of cold milk for the ultimate comfort treat.
- Pack them in a picnic basket for a delightful outdoor snack.
- Offer them as a sweet ending to a barbecue or summer gathering.
- Gift them to friends and family in a decorative box or tin.
- Crumble them over ice cream for a s’mores-inspired sundae.
Tips:
- Soften Butter Properly: Ensure your butter is softened to room temperature, but not melted. This is crucial for achieving the right cookie texture.
- Don’t Overmix: Overmixing the dough can lead to tough cookies. Mix the dry ingredients into the wet ingredients until just combined.
- Chill the Dough: Chilling the dough prevents the cookies from spreading too thin and allows the flavors to develop.
- Watch the Marshmallows: Keep a close eye on the marshmallows while broiling to prevent them from burning.
- Use Quality Chocolate: Opt for high-quality semi-sweet chocolate for the best flavor and melting consistency.
Prep Time: 20 minutes (plus 1 hour chilling time)
Cook Time: 12 minutes
Total Time: 1 hour 32 minutes
Nutrition Information:
Calories: Approximately 220 per cookie
Protein: 3g
Sodium: 100mg
Conclusion
These S’mores Chocolate Chip Cookies are a delicious and delightful treat that captures the essence of a campfire classic. With their soft, chewy texture, gooey marshmallows, melted chocolate, and crunchy graham cracker crumbs, they are sure to be a hit with everyone. Whether you’re baking for a special occasion or simply craving a sweet treat, this recipe is a perfect choice. So gather your ingredients, preheat your oven, and get ready to create a batch of cookies that will transport you back to those warm, nostalgic summer nights. Enjoy!
Write 5 questions and answers about this recipe.
Q1: Can I use different types of chocolate chips?
A1: Absolutely! While semi-sweet chocolate chips are recommended for the classic s’mores flavor, you can experiment with milk chocolate chips, dark chocolate chips, or even white chocolate chips to create your own unique twist on the recipe. Each type of chocolate will impart a different level of sweetness and richness, so choose according to your preference.
Q2: What can I do if I don’t have graham crackers?
A2: If you don’t have graham crackers on hand, you can substitute them with other similar cookies or crackers. Digestive biscuits, shortbread cookies, or even crushed pretzels can work as a substitute, providing a different but equally delicious texture and flavor.
Q3: How do I prevent the marshmallows from burning under the broiler?
A3: The key to preventing marshmallows from burning is to keep a close eye on them while they are under the broiler. Position the oven rack so that the cookies are not too close to the broiler, and only broil for a very short time—usually 1-2 minutes is sufficient. If your broiler runs hot, consider using the low broil setting.
Q4: Can I make the cookie dough ahead of time and bake it later?
A4: Yes, you can definitely make the cookie dough ahead of time. In fact, chilling the dough for at least an hour (or even overnight) can improve the flavor and texture of the cookies. Store the dough tightly wrapped in plastic wrap or in an airtight container in the refrigerator for up to 2 days. When you’re ready to bake, let the dough sit at room temperature for about 10-15 minutes before scooping and baking.
Q5: What’s the best way to store these cookies to keep them fresh?
A5: To keep these cookies fresh, store them in an airtight container at room temperature. They will stay soft and delicious for up to 3-4 days. For longer storage, you can freeze the baked cookies. Wrap them individually in plastic wrap and then place them in a freezer bag or container. They can be frozen for up to 2-3 months. When you’re ready to enjoy them, simply thaw them at room temperature.
S’mores Chocolate Chip Cookies
Ingredients
Method
- Step 1: Cream Together the Sugars and Butter
- In a large mixing bowl, combine the softened butter, brown sugar, and granulated sugar. Use a handheld mixer or a stand mixer with the paddle attachment to beat the mixture on medium speed for about 2-3 minutes until it becomes light and fluffy. This step is crucial for achieving a soft cookie texture.
- Step 2: Add Egg and Vanilla
- Add the large egg and pure vanilla extract to the creamed mixture. Mix until everything is well combined, ensuring there are no streaks of egg yolk. Scrape down the sides and bottom of the bowl to ensure even mixing.
- Step 3: Combine Dry Ingredients
- In a separate bowl, whisk together the all-purpose flour, cornstarch, baking soda, and salt. The cornstarch helps to keep the cookies soft, while baking soda provides the necessary lift.
- Step 4: Mix Wet and Dry Ingredients
- Gradually add the dry ingredients to the wet ingredients. Beat on low speed until just combined. Be careful not to overmix, as this can result in tough cookies. The dough will be slightly thick.
- Step 5: Add Chocolate Chips and Chill
- Stir in the semi-sweet chocolate chips until they are evenly distributed throughout the dough. Cover the dough tightly with plastic wrap or aluminum foil and chill in the refrigerator for at least 1 hour, or up to 2 days. Chilling allows the flavors to meld together and prevents the cookies from spreading too much during baking.
- Step 6: Preheat Oven and Prepare Baking Sheets
- When you’re ready to bake, preheat your oven to 350°F (177°C). Line two large baking sheets with parchment paper or silicone baking mats. This will prevent the cookies from sticking and make cleanup easier.
- Step 7: Shape the Cookies
- Remove the chilled dough from the refrigerator and let it sit at room temperature for about 10 minutes to soften slightly. Use a cookie scoop or your hands to form 1.5-tablespoon-sized balls of dough. Place the dough balls about 2 inches apart on the prepared baking sheets.
- Step 8: Bake the Cookies
- Bake the cookies for 10-11 minutes, or until the edges are barely golden brown and the centers still appear soft. The cookies will continue to bake slightly as they cool on the baking sheets.
- Step 9: Toast the Marshmallows
- Once the cookies are baked, switch the oven to high broil (or low if your oven tends to run hot). Place half a marshmallow, sticky side down, on top of each cookie. Return the cookies to the oven and broil for just 1-2 minutes, until the marshmallows are lightly toasted and golden brown. Watch them closely to prevent burning!
- Step 10: Melt Chocolate and Add Toppings
- While the cookies are cooling slightly, melt the chopped semi-sweet chocolate in a double boiler or microwave. If using the microwave, heat in 20-second intervals, stirring in between, until smooth and melted. Drizzle the melted chocolate evenly over the toasted marshmallows and sprinkle with crushed graham cracker crumbs.
- Step 11: Let the Cookies Set
- Allow the cookies to cool completely at room temperature for about an hour, or refrigerate for 30 minutes to speed up the setting process. This allows the chocolate to harden and the flavors to meld together beautifully.